Having a customer settings allows you to make your store welcoming and customer-friendly. This will help you to increase your sales as customers are confident that the payment options are secured and convenient.
In nopCommerce You can go to general customer settings (Configuration → Settings → Customer Settings)
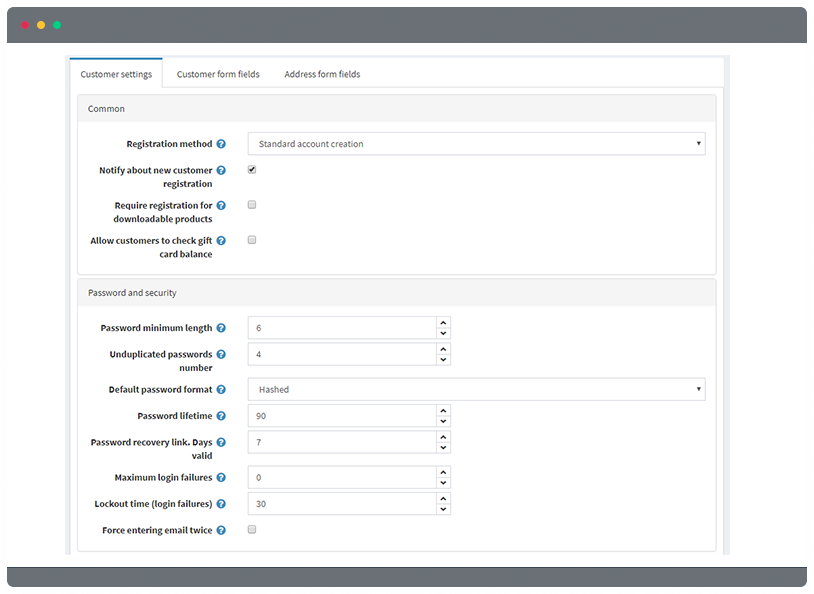
Common Settings
This includes options of registration method, notify about new customer registration and require registration for downloadable products
NopCommerceregistration method are follows:
Standard - this will enable users to register, no approval is required. This will also have the customers the option to register through social media account
Email Validation - this option allow users to register, however, they must accept the confirmation email sent to them before their account is approved.
Admin Approval - this will make users to enabled to register but administrator approval is required.
Disabled - will make the registration disable.
Check the Notify about new customer registration checkbox will enable the admin to get an email notification each time when a new customer is registered in nopCommerce store
Check the Require registration for downloadable products checkbox if customers have to complete registration in order to purchase downloadable products.
Password and security
This options enables you to set password and security makes your customers feel more convenient.
Set the nopCommerce Password minimum length. You can set how many characters the password can have
Unduplicated passwords number - number of passwords that will be not the same as the previous one.
Select the Default Password format:
Clear
Hashed
Encrypted
Note: This setting is for storing customers’ passwords and will be applied only to newly registered customers.
Password lifetime allows you to enter the number of days for the password expiration.
Password recovery link Days valid field, enter the number of days for password recovery link. Set it to 0 if you don’t want the link to expire.
Enter Maximum login failures
In the Lockout time (login failures) enter number of minutes to lockout users.
Ticking the checkbox Force entering email twice option if you want your customer to enter their password twice during the registration in nopCommerce store.
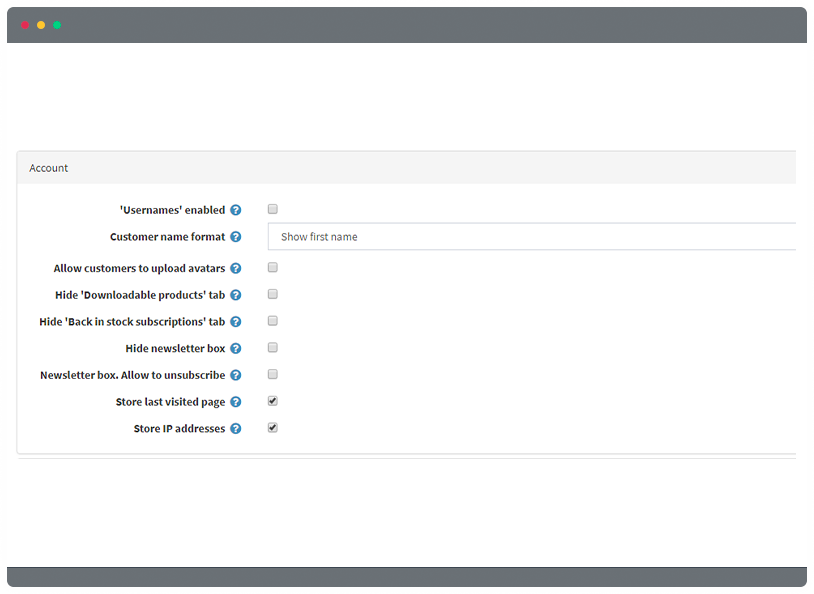
Tick the 'Usernames' enabled checkbox enable users to use usernames for login and registration instead of using their emails.
Note: it is not recommended to change the option in the Product environment. When this checkbox is selected, the following options are displayed:
Allow customers to change their usernames: select this option if customers are allowed to change their usernames in nopCommerce.
Allow customers to check the availability of usernames: select this option to enable customers to check the username availability
Select the Customer name format, as follows:
Show Emails
Show Usernames
Show Full Names
Show First Name
The customer name will be shown in the store next to news and blog comments, on forums and more.
Allow customers to upload avatars. The customers’ avatars will be shown in the nopCommerce store next to their news and blog comments, on forums and more. If this option is selected, the next checkbox is displayed.
Tick the Default avatar enabled checkbox, to display the default user avatars.
Tick the Hide ‘Downloadable products’ tab checkbox, to hide this tab on My Account page.
Tick the Hide 'Back in stock subscriptions' tab checkbox, to hide this tab on My Account page
Tick the Hide newsletter box checkbox if you do not want to display the newsletter subscription box.
Tick the Newsletter box. Allow to unsubscribe checkbox to display "unsubscribe" option in the newsletter block. It's required in some Europe countries.
Tick the Store last visited page checkbox, to store the last visited page in your nopCommerce store. You can then view the last visited by different customers pages on the Online customers page (Customers → Online customers). You can untick this checkbox, to improve the nopCommerce site performance.
External authentication
In simple term, this will allow user to use their social media account to register to the nopCommerce store.
Tick the External authentication. Auto register enable checkbox if you want to enable auto registration in your nopCommerce store when customers use their social media account to register, such as, Facebook or Twitter.
Customer form fields
On the Customer form fields tab, define whether the following form fields are enabled in the system:
Gender
Date of Birth you can also decide whether this field should be required and enter a minimum allowed age (for example, to ensure that a customer is above 18)
Company
Address
Postal code
City Country State Phone Fax
Tick the Accept Privacy policy enabled checkbox, to request customers in your nopCommerce store to accept the privacy policy during the registration.
Tick the ‘Newsletter’enabled checkbox to offer customers a newsletter subscription during the registration.
When the ‘Newsletter’ enabled checkbox is selected, the Newsletter ticked by default checkbox is displayed, which automatically sets the 'Newsletter' checkbox on the nopCommerce registration page as ticked.
On the Address Form Fields tab, you as a store owner can also manage the address form fields available during the registration in the nopCommerce.
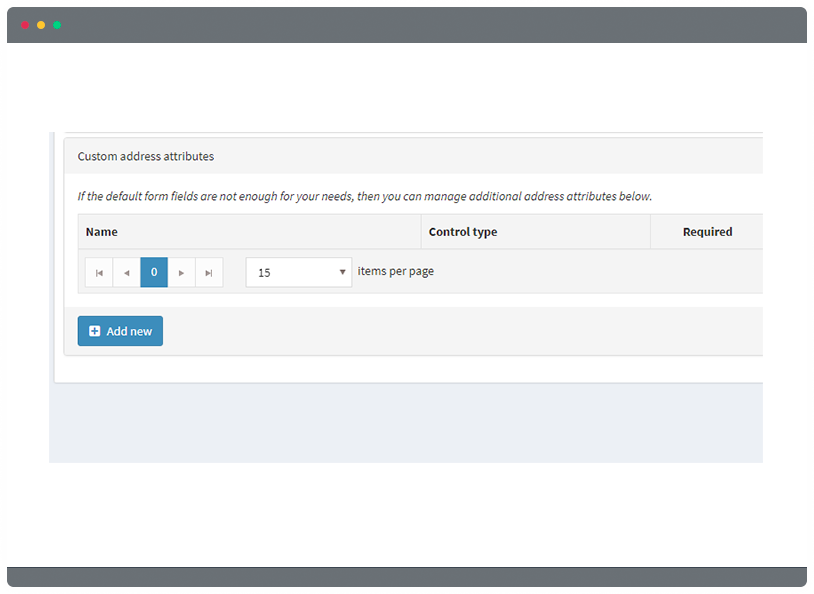
Custom customer attributes
If you wish to have an additional form fields, you can add your own custom additional customer attributes available in the nopCommerce registration and during checkout.
Placeholder image admin with a Zoom
Customer Roles & Permissions
Permissions in NopCommerce
The NopCommerce uses roles and permissions that allow users to have a different levels of access to the nopCommerce Admin panel. When you setup your first nopCommerce store, you receive a set of login informations for the Admin role which has a full access to the nopCommerce system.
Also, you can restrict level of permissions for other members of your team. For a blogger in your team, you can give access to specific pages only and you can also create an additional admin role but access to plugin installation page is disabled.
If the user’s access is restricted, other pages will not be visible to them.
User Roles
To give someone a restricted access to the nopCommerce Admin area, you have to create first a role that has desired level of permissions. After the nopCommerce role is saved, you can add new users again and assign the restricted role to grant them limited access to the nopCommerce Admin.
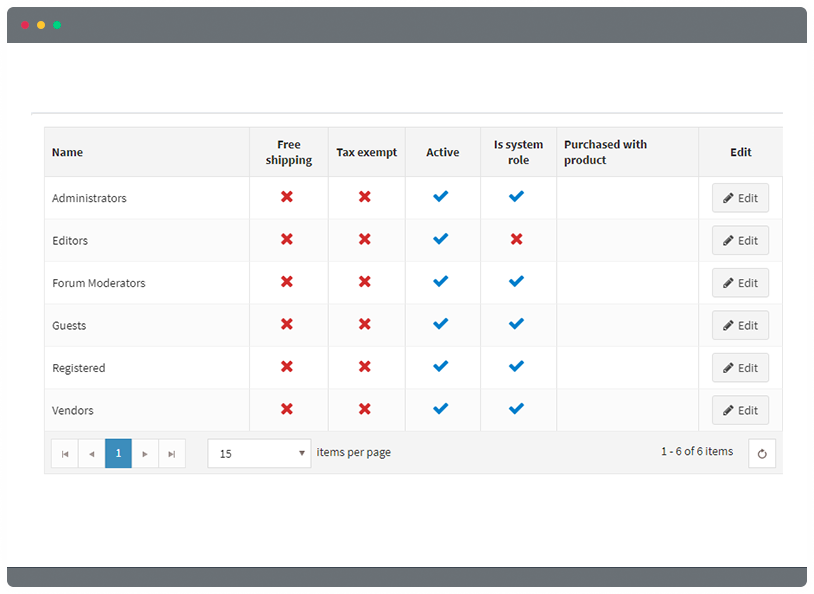
To add a new role in your nopCommerce store, you can go to Customer > Customer Roles and Click the Add New button on the top right corner.
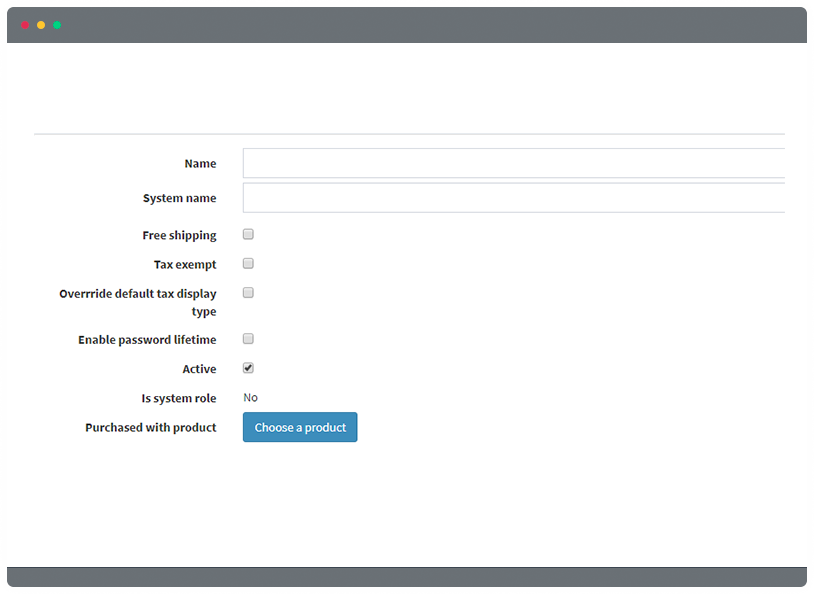
The following are the descriptions to each options when adding a New Role:
Enter a descriptive Role Name - this is the name of the customer role
System Name - the system name of the customer role (eg: Admin, Blogger, Forum, Guest, Registered, Vendors)
Tick the Free shipping checkbox (optional) - this will allow customers to get free shipping
Tick the Tax exempt checkbox (optional) - make customers have a tax free purchases
Is system role is predefined and cannot be modified - a value that indicates whether it is a system role or not
Purchased with product - a customer is added to this customer role once this product is purchased (paid).
Note: In case of refund or order cancellation you must manually remove a customer from this role.
Access Control List (ACL)
Restricts or grants users an access to certain areas of your nopCommerce site.
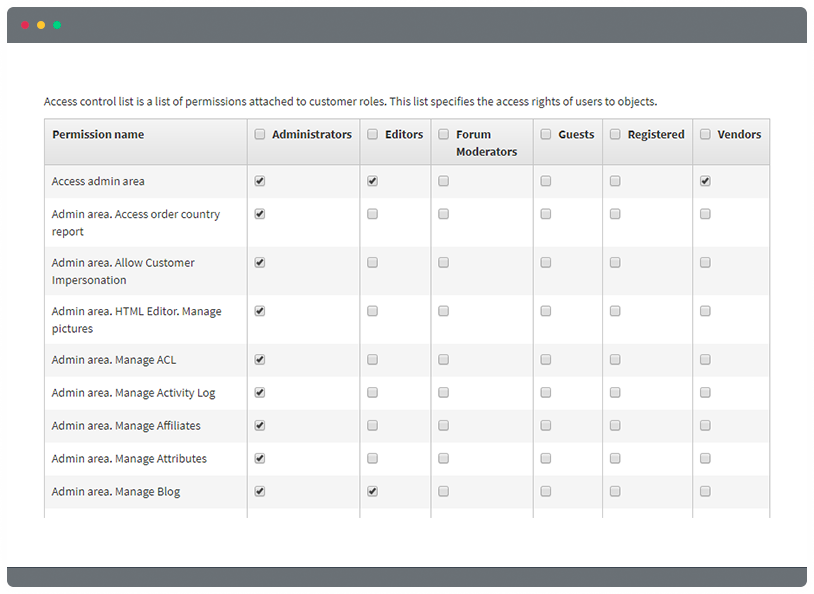
Select the required roles beside the Customer action items. The selected roles will have the access to the selected actions accordingly. Click to save your changes.
Vendors (Drop Ship Vendors)
Vendors
This is a special category of customers that is separate from the customer itself. In the NopCommerce, there is an option to register as seller in a default registration form in front end (footer section). After submitting the vendor’s form, you as a store owner have to approve the requests.
This allows vendors and suppliers to create, update, track and manage their products and orders in your nopCommerce store.
nopCommerce has tools for multi-vendor and has an option called drop shipping which enables you to sell online without having to keep stocks or ship orders. In this case, each product is assigned to a particular vendor whose details (including email address) are stored.
When an order is placed, an email is sent to a vendor for each product in the order. The email includes the products, quantities, etc. The vendor then ships an item to the customer on behalf of the merchant, who typically pays each of their vendors at the end of the month.
Products from multiple independent vendors appear in the common nopCommerce product catalog and your website visitors can shop at one nopCommerce store even if your products are supplied by hundreds of different vendors from all over the world.
Each vendor is provided with an administrator panel access to manage their products, review sales reports and order details regarding their products. Vendors can’t see each other's activities.
The money goes to the merchant account of the store administrator who then manually distributes funds among the vendors according to the order history, which is tracked and managed separately for each provider. In this manner, the customer only sees one charge from the main company.
The following procedure describes how to setup and provide a vendor record with access to the vendor portal site.
To set up a vendor account (Customers → Vendors), then click a new vendor
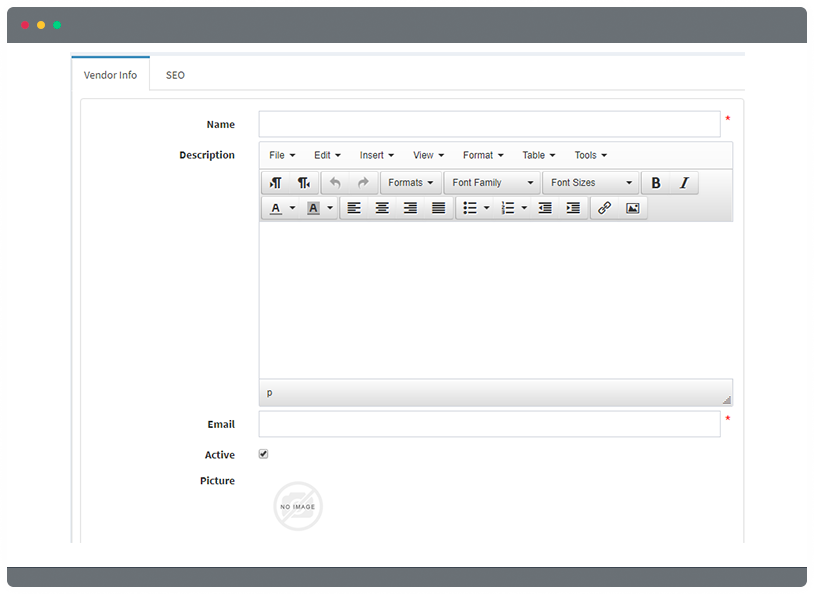
Define the following vendor’s details:
- Name of the vendor
- Description for the vendor
- Vendor's Email. “Order placed” notifications will be sent to this email.
Note: the appropriate message template is disabled by default, you can change it in Message Templates section
- Admin comment an optional information for internal use
- To Allow customers to select page size this is to show how much list is visible in one page
- Page Size options (comma separated)
- Tick Active checkbox to activate the vendor
- Display order of the vendor which sets the vendor’s list
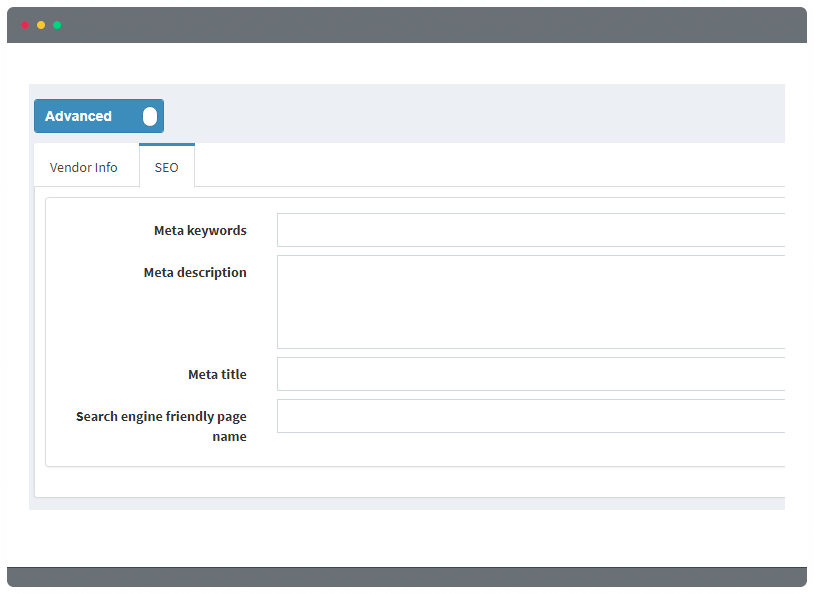
Define SEO parameters
This is where you can set your SEO settings for the vendors.
Assigning a Vendor to a Customer Record
This step is optional and required only if you want your vendor to be able to login to his administration portal and manage products, orders, etc.
If you do not want vendors to have access to your site, ignore this step to enable the store owner manage all vendor mappings.
Register a vendor manually
To register a new vendor, you can go to Customers > Customers
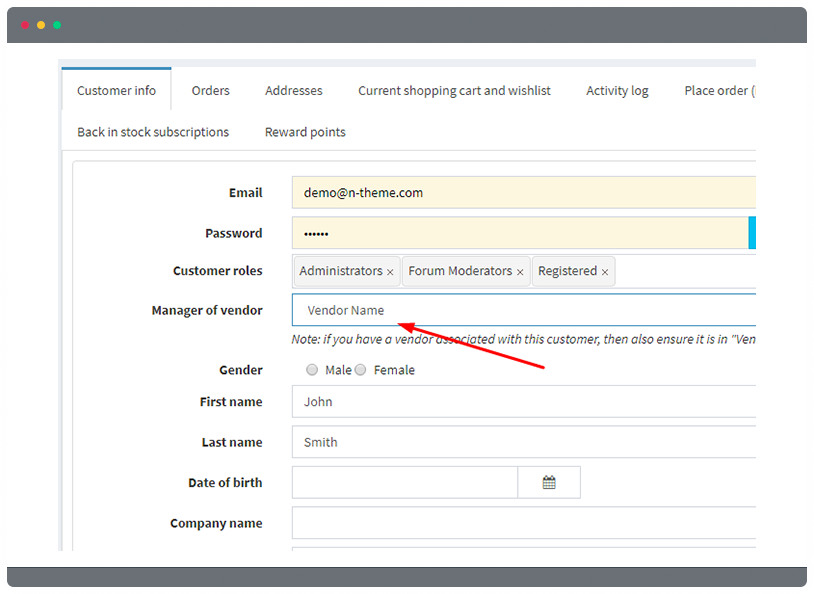
Edit a customer record you want to assign a vendor to:
On the Customer Info tab, select a vendor record previously created from Manager of Vendor dropdown list.
Ensure the Vendors customer role is selected in the Customer Roles field.
Note: A Vendor customer account cannot have Administrators customer role (which is defined as the default)
After the vendor's customer account is set up, the vendor can use this customer account to manage his products, orders, shipments, and view reports. The Administration link at the top of the public store will be displayed after logging in.